Hi, there. This was my first digital painting. I'm going to show you the process of completing this 60% digital painting. So, are you ready for this 100 steps tutorial?
Tools used: Wacom Bamboo Fun Tablet & Mouse
Software Used: Paint Tool SAI, Adobe Photoshop CS4, Adobe Illustrator CS4
Part A - Hair

1. 1. I’ve done the character sketch using Paint Tool SAI software before I start painting. After that, I export the file to Adobe Photoshop CS4. Open an A4 size paper and place my character sketch in a new layer. Open another new layer and start painting the hair using BRUSH tool.
1. 2. Paint a darker color at the new layer. You can change the brush color by just changing the FOREGROUND COLOR.

3. Use the SMUDGE
 tool to blend the color.
1. 4. Paint a new layer with a lighter blue and place it beneath the first hair painting layer.

1.
1. 5. Set your brush diameter to 1 pixel and select white color before painting at a new layer.

1. 6. Set the blending mode of this layer to soft light.

1. 7. Duplicate this layer.

1.

8. Now, I’ve done the hair painting. Group and name all the related layers.
Part B - Skin

1. 9. Paint the skin with a very light blue at a new layer under the hair group.

1. 10. Set the layer blending mode to lighten.

1. 11. Paint with a slightly darker blue at a new layer again. This layer will act as shadow.

1. 12. Apply Gaussian Blur effect.

1. 13. Change this layer blending mode to hard light.

1. 14. Repeat this step to layer 7 (a new layer) to enhance the shadow.

1. 15. Draw the outline of this character using brush tool at a new layer.

1. 16. Now, I’ve done the skin painting. Do remember always group and name your layers if you don’t want to merge the layers.
Part C - Eyes

1. 17. Use a black brush to paint the eyelash.

1. 18. Next, paint the eyeball with black color.


1. 19. Apply slightly glowing effect by painting blue color at the bottom of pupil and set that layer blending mode to hard light.


1. 20. Paint the pupil with light blue and set to hard light layer blending mode again.

1. 21. Paint the pupil with darker blue and set to overlay blending mode.

1. 22. Paint the pupil again with black color.

1. 23. Create a green glowing effect by painting a small region of light green and apply Gaussian Blur.

1. 24. Repeat the same steps for the other eye.

1. 25. Group the eyes painting layer and place it between the hair group and skin group.
Part D - Lips

1. 26. Enhance the outline of lips by painting blue on it.
Part E - Jewellery

1. 27. Now, paint the bracelet with a darker blue at new layer.

1. 28. Paint the reflection on the bracelet with a light blue and burn it with Burn tool ( Hotkey>O).

1. 29. Change the layer blending mode to Linear Dodge (Add).

1. 30. Again, paint with a lighter blue at the new layer and set to overlay layer blending mode.

1. 31. Add outline to the bracelet.

1. 32. Group all the bracelet painting layer and name it as “Jewellery”.


1. 33. Place a necklace image and extract it out using brush and mask.

1. 34. Transform the necklace using free transform tool. Apply Free transform, Warp, Perspective, Scale and Rotate to the necklace.

1. 35. Make 4 copies of Necklace layer.


1. 36. Apply Cutout effect to the first Necklace copy. You can get this effect by choosing Filter>Artistic>Cutout. Set the layer blending mode to Luminosity.

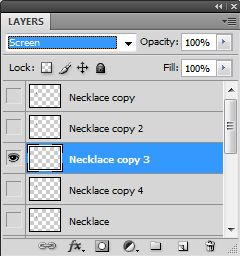
1. 37. Apply Dry Brush effect to the second Necklace copy. You can access this effect by clicking Filter>Artistic>Dry Brush. Set the layer blending mode to Screen.

1. 38. Apply 2 pixels Median effect to the third Necklace copy. Choose Filter>Noise>Median and drag the slide to change the value.

1. 39. Adjust the opacity of the forth Necklace copy to 27%.

1. 40. Merge all these four Necklace copies with the original Necklace. Merge the layers by right clicking all these 5 selected layers and choose Merge Layers.

1. 41. Adjust the color of necklace by choosing Image>Adjustments>Hue/Saturation (Hotkey> Ctrl + U).

1. 42. Paint the shadow of the necklace by adding a new light blue skin painting layer. Set the opacity of this shadow layer to 63%.
Part F - Cloth

1. 43. Now, you can start painting the cloth. Use a bigger diameter dark blue( foreground color=dark blue, Background color=black ) brush to paint the cloth.

1. 44. Add shadow with black brush at the other layer.


1. 46. Apply a 250 pixels Gaussian Blur effect to that light blue circle.

1. 47. Set the layer blending mode to Vivid Light.

1. 48. Group them and name as “Dress”.


1. 49. Group all the layers except the background layer and name it as “Character”.
To be continued...
No comments:
Post a Comment