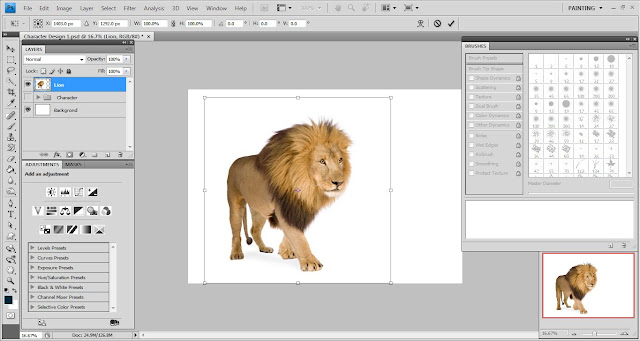
1. 50. Now, place a lion image and adjust its size using Free Transform tool.

1. 51. Flip the lion image by choosing Flip Horizontal when you are using the free transform tool. Extract it out using the same technique as extracting the necklace.

1. 52. Open a new layer and fill it white color using the Paint Bucket Tool.

1. 53. Cut a character shape out from this layer by using brush and mask technique.

1. 54. Apply a 26 pixels Gaussian Blur effect to this cutout character shape.

1. 55. This layer will act as extra glow.

1. 56. Link the Character group and Extra Glow layer.

1. 57. Adjust the character size using free transform tool (Hotkey> Ctrl + T).

1. 58. Copy 4 layers of the Lion image.

1. 59. The following steps will be similar to the previous necklace editing process. Apply Cutout effect to the first duplicate layer.


1. 60. Apply Dry Brush, Median effects to the subsequent layers.

1. 61. Merge all the 5 layers before proceed to the next steps.

1. 62. At a new layer above the Lion layer, paint a big light blue circle with a 2300 pixels brush.


63. Set its layer blending mode to Color with opacity 82% after applied the Gaussian Blur effect.

1. 64. Make a copy of it and adjust the opacity to 25%.

1. 65. Group them.

1. 66. Now, use a smoke brush set downloaded from Q Brush to create a special effect. Play with the angle and size of the smoke brush set.


67. Set the layer blending mode to Multiply. You can even apply free transform on the smoke brush painted.

1. 68. After that, open a new layer to paint a few circles with a normal basic brush.

1. 69. Apply Gaussian Blur effect and set the layer blending mode of its COPY to Overlay (with opacity 21%).

1. 70. After you’ve done your glowing effect, place a colosseum image and use the mask technique to extract the colosseum out. (TIPS : It’s much more easier if you use a tablet to extract an image.)


71. To transform the colosseum into a painting, you’ve to repeat the previous necklace and lion editing process. Make 4 copies of it and apply different artistic effects as you’ve done just now.

1. 72. Now, I want to add a glowing line to my wallpaper. Use Pen Tool to draw a curve line.

1. 73. Open a new layer and select the Brush tool to paint the curve line created.

1. 74. Back to the curve line layer and select Pen Tool. Right clicking on the curve line and choose Stroke Path. Select Brush and Simulate Pressure. Then, delete the curve line by using Delete Anchor Point Tool. Delete the curve line painting layer too after you’ve deleted the curve line.

1. 75. Double click the Glowing line layer and adjust the layer style. Apply Color Overlay and Outer Glow effects.

1. 76. Now, paint a few circles around the leg of lion at a new created layer. Apply 10 pixels Gaussian Blur effect.

1. 77. Adjust its layer style (applying Outer Glow effect).

1.

78. Group all the smoke and glowing effects and name it as “Effect”.

1. 79. Open the colosseum layer , flip and resize it.

1. 80. Duplicate it and flip vertically to create a reflection effect.

1. 81. Apply a 8.8 pixels Gaussian Blur effect to the Colosseum copy layer.

1. 82. Apply Ocean Ripple effect by choosing Filter>Distort>Ocean Ripple.

1. 83. Now, open a new layer and use Rectangular Marquee Tool ( Hotkey>M) to draw a rectangle. Fill in the rectangle with blue color using Paint Bucket Tool ( Hotkey> G).

1. 84. Apply Cloud effect by selecting Filter>Render>Clouds.


1.

85. Choose Filter>Sketch>Chrome to apply Chrome effect. Select Edit>Fade Chrome and choose Color Burn with 100% opacity.

1. 86. After that, apply Plastic Wrap effect by clicking Filter>Artistic>Plastic Wrap.

1. 87. Free transform the water layer created. Hold down Ctrl + Alt + Shift and drag the rectangle water box to create a perspective effect.

1. 88. Set the layer blending mode of Colosseum copy to Overlay before proceed to the next step.

1. 89. Group the 2 Colosseum layers.

1.
1. 90. Now, apply Hue/Saturation Adjustment ( Hotkey>Ctrl + U )to the Water layer created just now.

1. 91. I did paint an extra shadow at the hips of lion.

1.

92. Open a new layer and paint a few circles again. Apply 200 pixels Gaussian Blur effect to them.


1. 93. Place this layer above the Character group and adjust the Hue/Saturation of this layer.

1. 94. Set the layer blending mode to Vivid Light and name it as Smoke Effect.

1. 95. Paint a few white circles again. Adjust the layer style of it (apply Outer Glow effect ).

1. 96. Paint an extra glowing line to enhance the glowing effect of glowing line by using brush and applying Gaussian Blur effect. Do set the layer blending mode to Linear Dodge (Add).

1. 97. Now, create the sky using a set of Cloud brush downloaded from Q Brush.

1. 98. Create two layers of background and fill them with two different colors (Purple and Blue).

99. Set the opacity of Purple background to 81%.


1. 100. Add a title ( Paradise ) to your image. I done this using Adobe Illustrator CS4 and export it to Photoshop. Lastly, adjust the layer style of that title ( apply Outer Glow and Color Overlay effects).
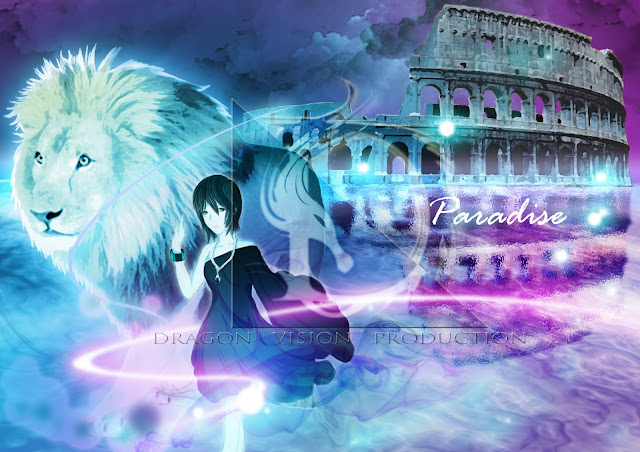
This is the finished art work ( with my logo watermark at the center) ~ ( I'll share the way of creating your very own watermark in the next tutorial. )
Thank you for reading & ciao~
No comments:
Post a Comment