Part A - Water

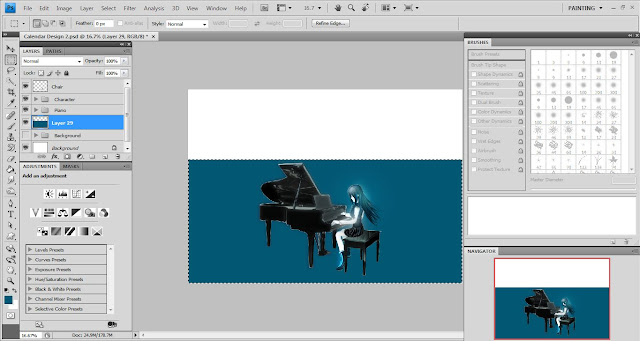
45 Use the Marquee tool ( Hotkey>M) to create a rectangle box and fill it with dark blue using Paint Bucket tool ( Hotkey>G ).
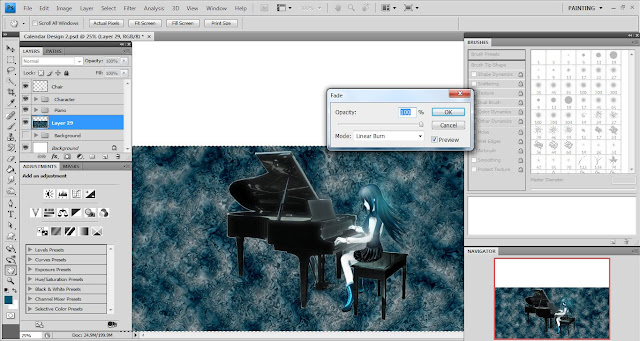
46 Now, we are going to create the water for this wallpaper. Apply Clouds, Gaussian Blur, Plastic Wrap, Chrome and Fade Chrome effect to that blue rectangle box. The process are similar to the previous tutorial.
Clouds: Filter>Render >Clouds
Gaussian Blur: Filter>Blur>Gaussian Blur
Plastic Wrap: Filter>Artistic>Plastic Wrap
Chrome: Filter>Sketch>Chrome
Fade Chrome: Edit>Fade Chrome>Linear Burn with 100 % opacity
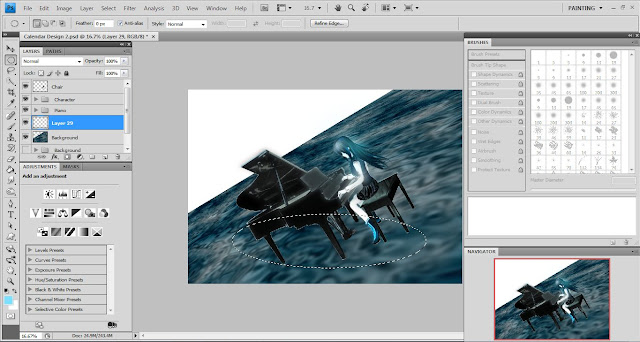
47 Press Ctrl + T ( Free Transform ) to transform the water created. To make the water looks perspective, hold down Ctrl + Shift + Alt while dragging the water box.
48 Select the Piano, Chair, Character and water layers. Rotate them 45 °.
Part B - Lightning in Water
49 Use the Elliptical Marquee tool to draw an oval under the piano in a new layer.
50 Fill the oval with light blue and rotate it 45 °.
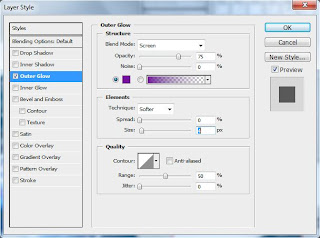
51 Apply Gaussian Blur and adjust its layer style ( Apply Outer Glow ). Set the layer blending mode to Overlay.
52 Make a copy of this layer and place it above the Chair layer. Set its layer blending mode as Vivid Light.
53 After that, paint a few dark blue circles using brush of different sizes.
54 Apply Clouds effect ( Filter>Render>Clouds ) to the circles. Hold down Ctrl and click at the layer thumbnail to make the selection before apply the Clouds effect.
55 Continue applying Plastic Wrap, Chrome and Fade Chrome effects to this layer.
56 Change the layer blending mode to Hard Light.
57 Duplicate this layer and set as Screen layer blending mode. Enlarge its size.
58 Duplicate this layer again and set the layer blending mode to Vivid Light.
Part C - Water Splash
59 Group them and name it as “Lightning in Water”. Then, create the water splash using special water brush downloaded from Q Brush.
60 Adjust its layer style.
61 Make a copy of it and set its layer blending mode to Screen.
62 Group them and adjust the opacity of this group to 85%.
Part D - Cloudy Sky
63 After you’ve done your water splash, it’s time to create the sky and clouds.
65 Add two moons, which are created using special Q Brush too, in a new layer. Always play with the diameters and angles of your brush to get an ideal composition.
66 Adjust its layer style. Apply Outer Glow, Inner Glow and Color Overlay effects to this particular layer.
67 Duplicate this Moons layer and set the layer blending mode to Difference.
68 Duplicate the Moons layer again and enlarge, rotate it using Free Transform tool ( Ctrl + T ).
69 Apply 43.9 pixels Gaussian Blur to this copy layer.
70 Set the layer blending mode of this copy layer to Linear Burn.
71 Make a copy of Moons Copy 2 and set the opacity as 47%.
72 I adjust the layer style of Sky layer ( Apply Color Overlay effect ) before proceed to the next step.
73 Add more sky effects using special Smoke Q Brush set. Adjust its layer opacity to 62%.
Part E - Boundary Fog
74 Now, I want to add a fog at the boundary. Hold down Shift and paint a straight dark blue line. Press Ctrl + T to rotate the thick line painted.
75 Apply Inner Glow and Color Overlay layer style effects.
76 Set the layer opacity to 93%.
Part F - Last Adjustment
77 Lastly, adjust the color of your wallpaper created using Brightness/Contrast Adjustments.
Part G - Watermark
78 After I’ve done my art work, I would like to add my very own logo in. You can export an AI file easily to Photoshop by simply dragging it from Illustrator and release it in Photoshop.
79 Apply Inner Glow and Bevel and Emboss layer style effects to the imported logo.
80 Change the layer blending mode to Soft Light with 90% opacity.
Final Artwork

That’s all for my Calendar Wallpaper 2 tutorial. Thank you for reading and again CIAO~^ ^


No comments:
Post a Comment